Connecting Tradingview Alerts To Broker Orders

Marketing

YouTube Link: https://www.youtube.com/watch?v=r-zPgRDPmVY
Published: October 14, 2022
Duration: 3:53
---
TradingView provides exceptional charting and analysis capabilities, but until recently, traders had no direct way to execute trades from their TradingView alerts. Automation platforms now bridge this gap, allowing any TradingView alert to trigger actual orders in your brokerage account. Understanding how to configure this connection opens powerful possibilities for automated trading.
The Webhook Connection Method
Webhooks provide the technical mechanism that connects TradingView alerts to broker order execution. When you create an alert in TradingView and configure it with a webhook URL, TradingView sends an HTTP request to that URL whenever the alert triggers. Automation platforms receive these requests and translate them into broker orders based on your configuration.
This architecture separates the signal generation (TradingView) from the order execution (your broker), with the automation platform serving as the intelligent translator between them. This separation provides flexibility, allowing you to use sophisticated TradingView indicators and strategies without requiring your broker to integrate directly with TradingView.
Setting Up Your Automation Strategy
The configuration process involves three main components: creating a webhook to receive TradingView alerts, defining a strategy that controls how orders execute, and connecting that strategy to your brokerage account through a subscription.
Creating the Webhook
The webhook serves as the receiving endpoint for your TradingView alerts. When creating a webhook, you specify basic parameters including a name for identification, the asset class you'll be trading, and ticker symbol restrictions if desired.
Setting the webhook to allow any ticker provides maximum flexibility, enabling you to use the same webhook for multiple different instruments. Alternatively, restricting the webhook to specific symbols adds a security layer preventing unintended trades if you accidentally trigger alerts for wrong instruments.
Once created, the webhook generates a unique URL that you'll use in your TradingView alert configuration. This URL remains constant, allowing you to use it across multiple alerts without needing to update anything on the automation platform side when creating new alerts.
Defining Strategy Parameters
The strategy layer controls how signals from TradingView translate into actual trades. Strategy settings include position sizing, order types, which side of the market to trade (long only, short only, or both), and risk management parameters.
For a basic automated strategy, you might configure a fixed dollar amount per position, such as $5,000. When a buy signal arrives from TradingView, the system calculates how many shares that dollar amount purchases at current market prices and submits the appropriate order to your broker.
Order type selection significantly impacts execution quality. Market orders guarantee execution but accept whatever price the market offers. Limit orders provide price control but risk missing trades if the market moves away from your limit price. Your strategy settings let you specify which order types to use for entries and exits independently.
Creating the Broker Subscription
The subscription connects your strategy to an actual brokerage account where orders will execute. This configuration step includes selecting which broker connection to use, confirming all strategy parameters are appropriate for the account, and enabling auto-submission so orders execute automatically without requiring manual approval.
Auto-submission represents the critical setting that transforms a semi-automated system into a fully automated one. With auto-submission disabled, you receive notifications of potential trades but must manually approve each one. With auto-submission enabled, orders execute automatically the moment valid signals arrive.
The ability to toggle auto-submission provides a safety mechanism. You might disable it when first testing a new strategy, manually reviewing each proposed trade to ensure the system behaves as expected before enabling full automation.
Configuring TradingView Alerts
After setting up your automation platform configuration, you must create alerts in TradingView that send appropriately formatted messages to your webhook URL.
Alert Conditions
TradingView allows alerts based on virtually any condition you can define. You might create alerts when price crosses a drawn line, when an indicator reaches a certain threshold, or when a strategy generates entry or exit signals.
For this example, three separate alerts control the trading system: an entry alert that triggers when price crosses above a specific level, a take-profit alert that triggers when price reaches the target, and a stop-loss alert that triggers when price falls to the stop level.
This multi-alert approach provides granular control over trade management. You can adjust profit targets and stop losses by simply moving the corresponding alert lines on your chart, without modifying any code or complex settings.
Message Formatting
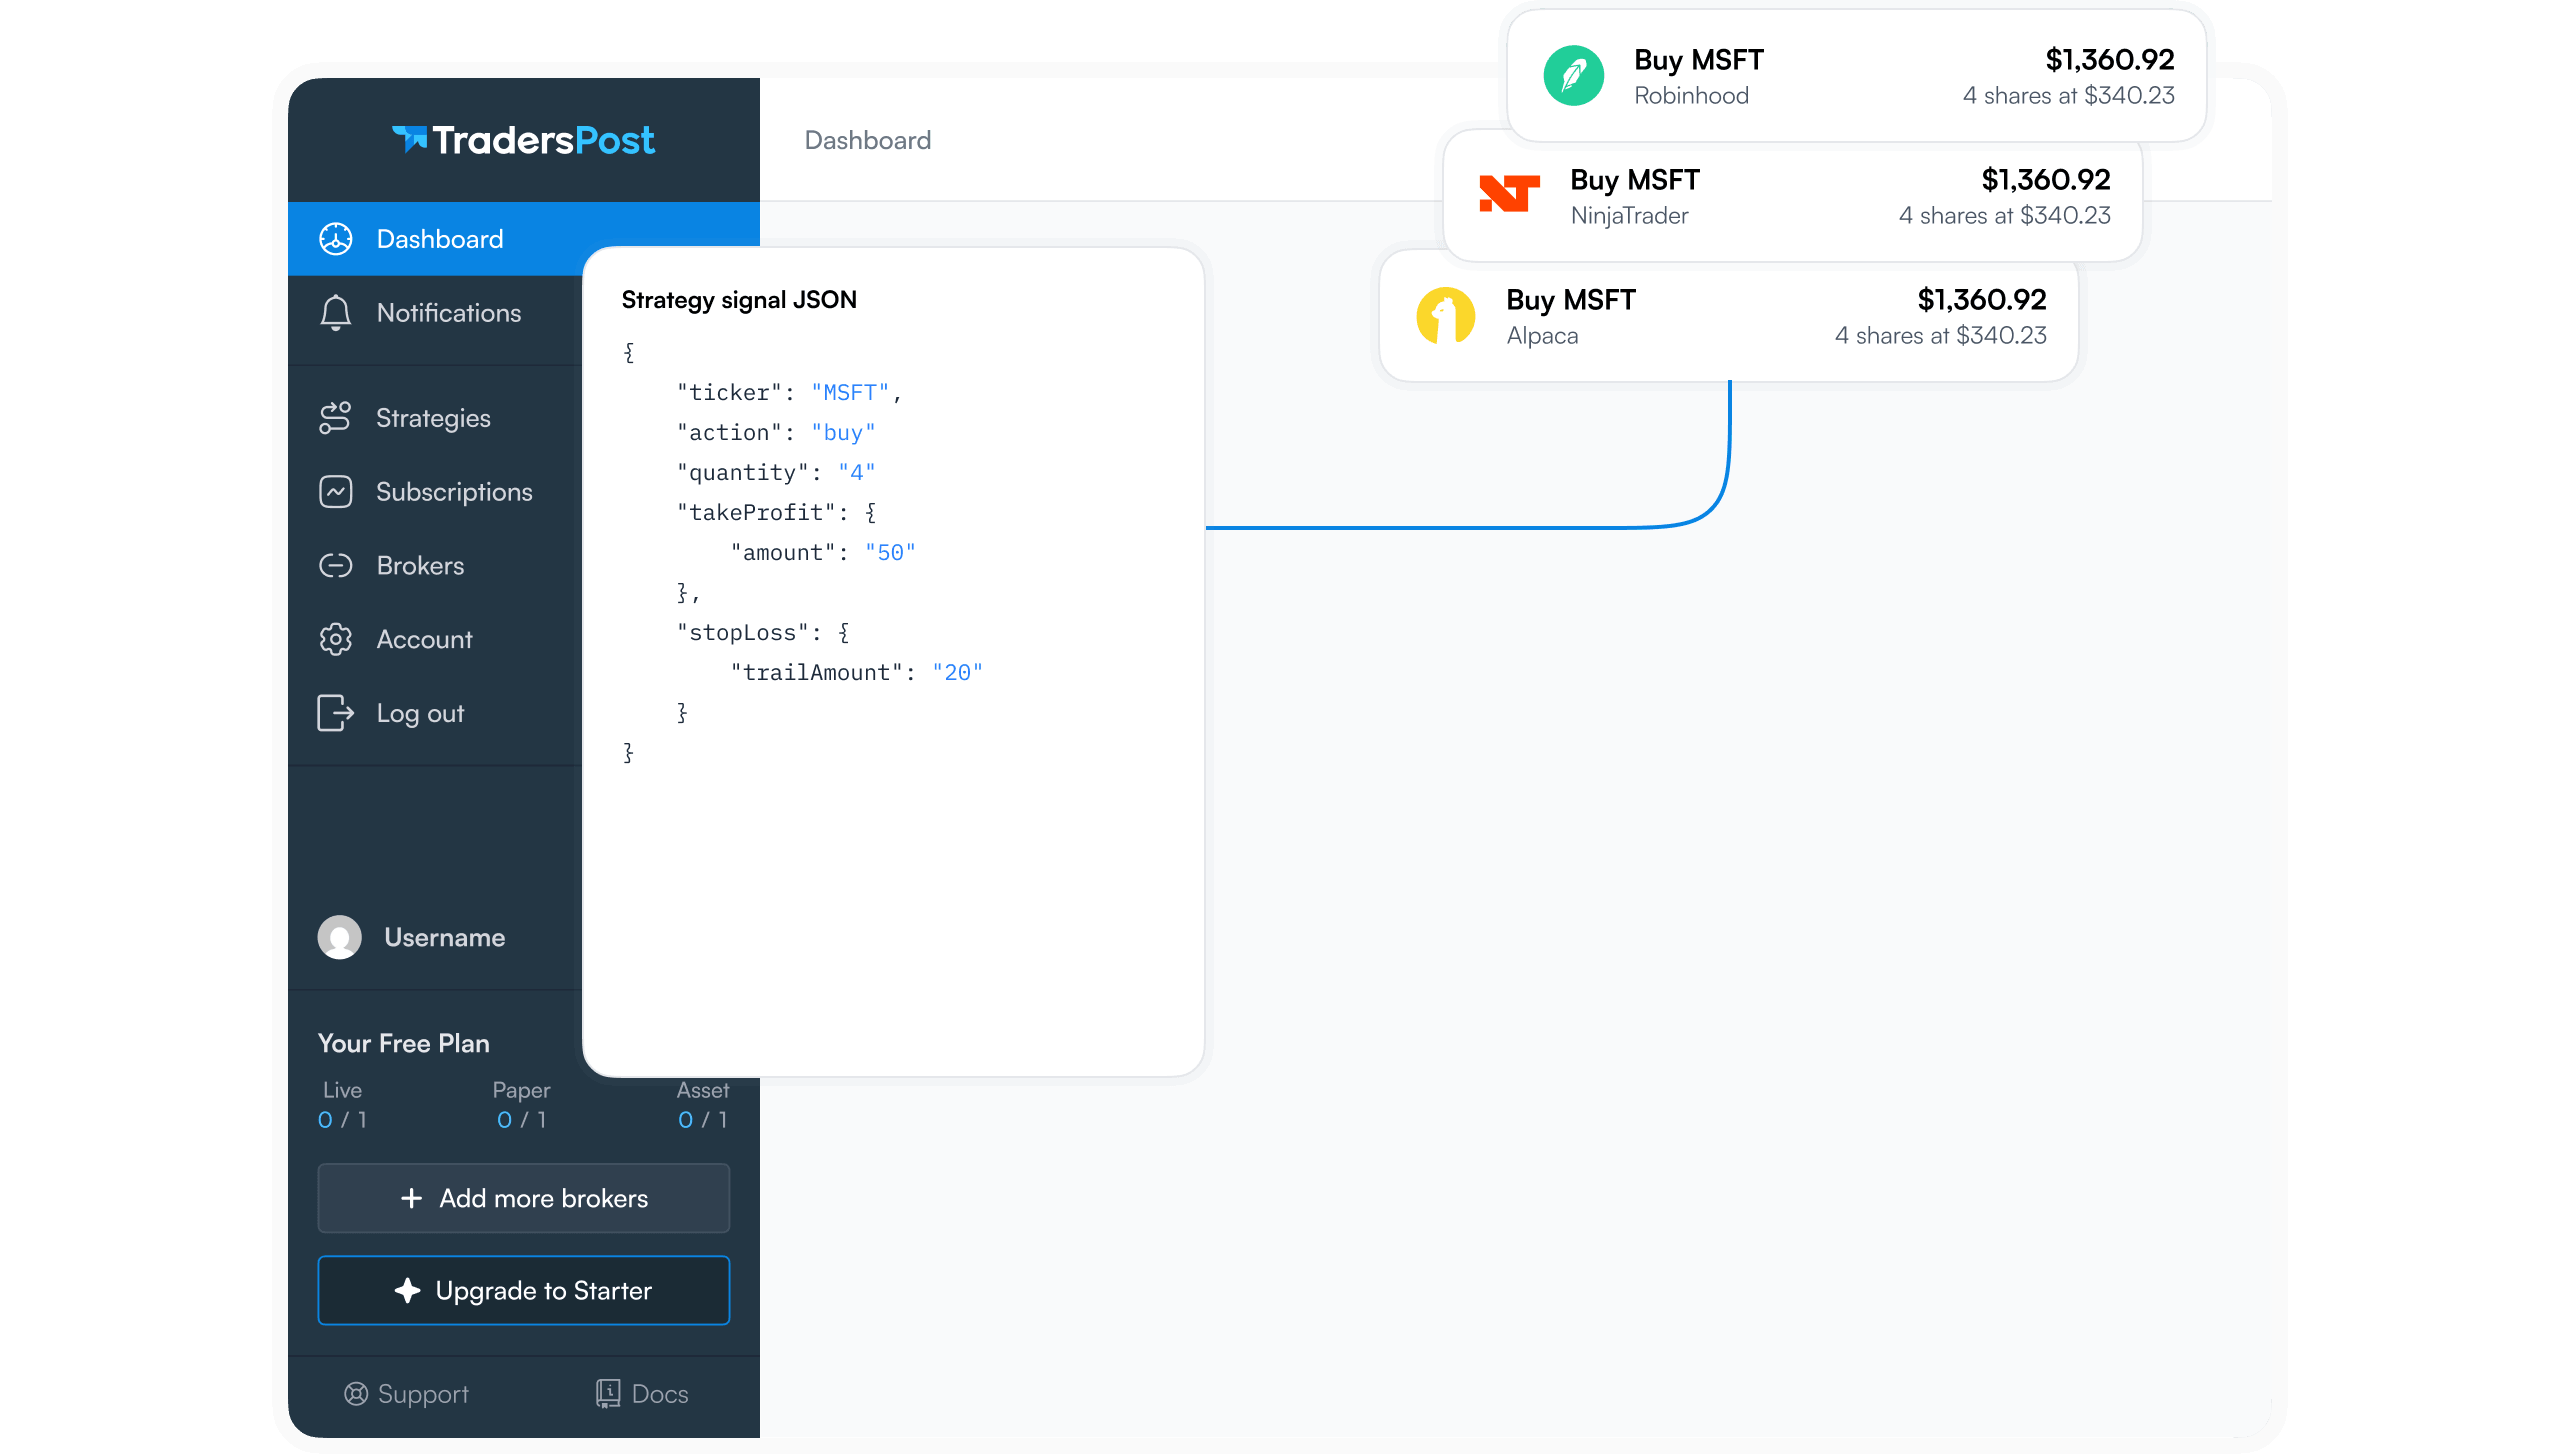
The alert message contains instructions for the automation platform in JSON format. JSON provides a structured way to include multiple pieces of information in a single message, such as which symbol to trade, what action to take, and any special instructions.
A basic entry message might look like: ` { "ticker": "{{ticker}}", "action": "buy" } `
The double curly braces around "ticker" represent a TradingView placeholder that gets replaced with the actual symbol of the chart where the alert triggered. This allows you to use the same alert configuration across multiple instruments without manually specifying each symbol.
For exit alerts, you simply change the action to "exit": ` { "ticker": "{{ticker}}", "action": "exit" } `
This message instructs the automation platform to close the current position in the specified symbol, regardless of whether it's a long or short position.
Webhook URL Configuration
In the TradingView alert setup dialog, the notifications section includes a field for webhook URL. Paste your automation platform's webhook URL here. TradingView will send an HTTP POST request to this URL with your message whenever the alert triggers.
You can configure additional notification methods like email or SMS simultaneously with the webhook. This redundancy ensures you stay informed about your automated system's activity even if you're not actively monitoring your broker account.
Testing Your Automated System
Before running any automated trading system with real money, thorough testing ensures it behaves as expected.
Manual Alert Triggering
TradingView allows you to manually trigger alerts by dragging alert lines through the current price. This capability enables testing without waiting for actual market conditions to meet your alert criteria.
For the entry example, dragging the entry alert line down through the current price triggers the alert immediately, sending the buy message to your webhook. You should see the corresponding order appear in your broker account within seconds.
Similarly, you can test exit functionality by dragging either the profit target or stop loss line through the current price, verifying that exit signals properly close the position.
Monitoring Execution
Watch both your automation platform's logs and your broker account during initial testing. The automation platform logs show exactly what messages arrived from TradingView and what orders were sent to your broker, helping you verify the system interprets your alerts correctly.
Your broker account confirms actual execution, showing filled orders at specific prices. Comparing expected behavior (based on your TradingView alert setup) with actual behavior (shown in broker fills) reveals any discrepancies requiring adjustment.
Paper Trading Validation
Most automation platforms support paper trading modes that simulate order execution without risking real capital. Running your automated system in paper trading for several days or weeks provides confidence in its reliability before transitioning to live trading.
Paper trading reveals potential issues with your alert logic, message formatting, or strategy parameters that might not be obvious during brief manual testing. Some problems only become apparent after the system handles various market conditions and edge cases.
Common Configuration Patterns
While the basic example demonstrates simple entry and exit alerts, you can create more sophisticated automation using the same fundamental approach.
Strategy-Based Automation
If you've coded a strategy in TradingView using Pine Script, you can create alerts based on strategy orders rather than manual lines. These alerts fire whenever your strategy generates an entry or exit, allowing complete automation of complex trading logic.
Multiple Position Management
Some trading approaches involve building positions across multiple entries or scaling out of positions across multiple exits. You can create alerts for each entry and exit level, each sending appropriately sized orders to your automation platform.
Dynamic Order Types
While this example uses market orders configured in the strategy settings, you can include order type instructions in your alert messages themselves. This allows some alerts to use market orders while others use limit orders, providing more sophisticated execution control.
Risk Management Considerations
Automated trading magnifies both good decisions and mistakes. Proper risk management configuration ensures mistakes remain manageable rather than catastrophic.
Position Size Limits
Configure maximum position sizes in your strategy settings to prevent any single alert from creating excessive exposure. Even if an alert incorrectly fires multiple times in rapid succession, position size limits cap your maximum risk.
Daily Loss Limits
Many automation platforms allow daily loss limits that automatically pause trading if losses reach a specified threshold. This circuit breaker prevents a malfunctioning system from causing catastrophic losses while you're unavailable to intervene.
Alert Monitoring
Configure alerts on your automation platform to notify you of every trade execution. These notifications serve as a continuous audit trail, helping you quickly identify if your system starts behaving unexpectedly.
Advantages of Alert-Based Automation
This approach to automation offers several significant advantages over alternative methods.
Flexibility
You can use any TradingView indicator, drawing tool, or strategy as the basis for your automated trading. This flexibility lets you leverage TradingView's extensive marketplace of thousands of indicators without requiring those indicators to be specifically designed for automation.
Accessibility
Creating TradingView alerts requires no programming knowledge. Traders who cannot code sophisticated strategies can still automate their trading based on simple technical levels or publicly available indicators.
Rapid Iteration
Testing new trading ideas becomes much faster when you can implement them through simple alert configuration rather than extensive coding. Draw levels on a chart, create alerts, and observe how those levels would perform in live trading.
Transitioning to Live Trading
After successful paper trading, transitioning to live trading requires careful consideration.
Start Small
Begin live automated trading with your smallest position sizes and most conservative strategies. This approach lets you verify the system's reliability with real money while minimizing risk during the learning phase.
Gradual Scale-Up
Only after observing consistent, expected behavior over weeks or months should you increase position sizes or add more aggressive strategies. Rushing this process risks discovering problems at exactly the wrong time - when you've committed significant capital.
Continuous Monitoring
Even well-tested automated systems require ongoing monitoring. Market conditions change, broker APIs occasionally have issues, and trading strategies go through periods of underperformance. Regular monitoring helps you identify when intervention or adjustment becomes necessary.
Building Reliable Automated Trading
Connecting TradingView alerts to broker orders transforms static analysis into active trading. However, this power comes with responsibility. Successful automated traders combine proper system configuration with ongoing monitoring, appropriate risk management, and realistic expectations about what automation can achieve. The technical connection is straightforward, but building reliable, profitable automated trading requires the same discipline and skill that successful manual trading demands.