How to Log Messages in Pine Script v6
How to use Pine Script v6 runtime logging with log.info(), log.warning(), and log.error() to debug your TradingView scripts effectively.

Marketing
Reviewed by Mike Christensen
Fact-checked by Mike Christensen

Bottom Line
- Pine Script v6 adds log.info() log.warning() and log.error() functions for runtime debugging in the Pine Logs pane
- Log messages support string formatting with str.format() patterns for structured output
- Logging replaces the common v5 workaround of using plot() or label.new() to debug values
- The Pine Logs pane supports filtering by severity level and provides timestamps for each log entry
Debugging Pine Script code has always been one of the most frustrating parts of developing indicators and strategies on TradingView. Before version 6, developers relied on awkward workarounds to inspect runtime values. Pine Script v6 changes everything with a dedicated runtime logging system that sends structured messages to a dedicated Pine Logs pane.1
This guide covers the three logging functions, how to format messages with dynamic values, practical debugging patterns, and performance best practices so your scripts stay fast while giving you the visibility you need.
Debugging Before v6 Was Painful
If you wrote Pine Script before v6, you know the struggle. There was no built-in way to print a message or inspect a variable at runtime. Instead, developers resorted to creative hacks that cluttered charts and limited what you could actually see.
The most common workarounds included plotting values on the chart with plot(), creating temporary labels with label.new(), building debug tables with table.new(), or using bgcolor() to flag when conditions were true. Each approach had serious limitations.
Plotting only works for numeric values and adds lines to your chart that have nothing to do with your actual strategy. Labels consume drawing objects and can only display text at specific bar positions. Tables are heavyweight and require careful positioning. None of these approaches let you inspect values across many bars without overwhelming the chart.
Here is a typical v5 debugging hack that plots an RSI value and uses a label to show a string message:
//@version=5
indicator("Debug Hack Example", overlay = true)
float rsiVal = ta.rsi(close, 14)
// Hack 1: Plot the value on a separate pane
plot(rsiVal, "RSI Debug", color.orange)
// Hack 2: Use a label to show text
if ta.crossover(rsiVal, 70)
    label.new(bar_index, high, "RSI crossed 70: " + str.tostring(rsiVal),
         style = label.style_label_down, color = color.red)
Pine Script v6 eliminates the need for all of these workarounds with three dedicated logging functions.2
The Three Log Functions
Pine Script v6 introduces three functions in the log namespace, each corresponding to a different severity level.3 All three share the same syntax and formatting capabilities. The only difference is how they are tagged in the Pine Logs pane.
log.info()
Use log.info() for general-purpose debugging messages.3 This is the function you will use most often to inspect variable values, confirm that code paths are executing, and track calculation results across bars.
//@version=6
indicator("log.info() demo", overlay = true)
float smaFast = ta.sma(close, 14)
float smaSlow = ta.sma(close, 28)
if ta.crossover(smaFast, smaSlow)
    log.info("Bullish crossover on bar {0}. Fast SMA: {1}, Slow SMA: {2}", bar_index, smaFast, smaSlow)
Each log.info() call sends a message tagged with the "info" level to the Pine Logs pane.4 The message appears with a timestamp corresponding to the bar where the function executed.
log.warning()
Use log.warning() to flag conditions that are not errors but deserve attention.3 This is ideal for situations like an unusual number of consecutive trades, unexpected input combinations, or values approaching critical thresholds.
//@version=6
strategy("log.warning() demo", overlay = true)
if strategy.opentrades > 10
    log.warning("{0} positions opened in the same direction in a row. Try adjusting your entry logic.", strategy.opentrades)
Warning messages stand out visually in the Pine Logs pane, making it easy to spot potential issues without scanning through hundreds of info messages.
log.error()
Use log.error() for serious conditions that indicate something has gone wrong. Unlike a runtime error that halts your script, log.error() simply records the message and lets execution continue.3 This is perfect for catching edge cases like division by zero, excessive drawdown, or failed data requests.
//@version=6
strategy("log.error() demo", overlay = true)
last10Perc = strategy.initial_capital / 10 > strategy.equity
if last10Perc and not last10Perc[1]
    log.error("The strategy has lost 90% of the initial capital!")
Error messages are displayed with the highest visual priority in the Pine Logs pane, so they are impossible to miss.
The Pine Logs Pane
All log messages appear in the Pine Logs pane, which is accessible from the bottom panel of the TradingView interface.4 Each entry in the pane includes the logging level, the formatted message text, and a timestamp corresponding to the bar where the log function executed.
The pane provides several features that make debugging efficient. You can click on any log entry to navigate the chart directly to the bar where that message was generated.4 TradingView displays a temporary label above the bar showing the date and time information. The label format depends on your chart timeframe, with daily charts showing the weekday and date, and intraday charts also including the time of day.
Filtering by Severity
The rightmost icon above the messages in the Pine Logs pane opens a "Filter levels" dropdown menu with checkboxes for each logging level: Info, Warning, and Error.4 Uncheck any level to hide those messages from the displayed results. This is invaluable when your script generates many info messages but you only want to see warnings and errors.
Multiple Scripts
Every script on the chart that generates logs maintains an independent log history.4 The Pine Logs pane shows logs for only one script at a time. To switch between scripts, select the title from the dropdown menu at the top of the pane.
String Formatting with Logs
The real power of Pine Script logging comes from its string formatting capabilities. All three log functions accept a formatting string with placeholders in curly braces, followed by the values to insert.3 This uses the same formatting syntax as str.format().
Basic Placeholders
Each placeholder uses the index of the argument, starting from zero. You can reference the same argument multiple times and use arguments in any order.
//@version=6
indicator("Formatting demo", overlay = true)
if barstate.isconfirmed
    log.info("Bar {0}: Open={1}, High={2}, Low={3}, Close={4}", bar_index, open, high, low, close)
Number Format Specifiers
For precise control over numeric output, add format specifiers inside the placeholder. The number modifier with a pattern controls decimal places and formatting style.
//@version=6
indicator("Number formatting demo", overlay = true)
float rsiVal = ta.rsi(close, 14)
float pctChange = (close - close[1]) / close[1]
if barstate.isconfirmed
    log.info(
         "RSI: {0,number,#.##}, Change: {1,number,percent}, Price: {2,number,currency}",
         rsiVal, pctChange, close
     )
The available format specifiers include #.## for controlling decimal places, percent for displaying values as percentages, currency for dollar formatting, and integer for rounding floats to whole numbers.3 These specifiers follow the same rules as str.format(), which means you can build highly structured diagnostic output without manual string concatenation.
Multi-Line Messages
Use the newline character \n inside your formatting string to create multi-line log entries. This is especially useful for logging multiple related values in a single message.
//@version=6
indicator("Multi-line log demo", overlay = true)
float rsi = ta.rsi(close, 14)
float atr = ta.atr(14)
float sma = ta.sma(close, 20)
if barstate.isconfirmed
    log.info(
         "Bar {0} Summary:\nRSI: {1,number,#.##}\nATR: {2,number,#.#####}\nSMA: {3,number,#.##}\nClose: {4,number,#.##}",
         bar_index, rsi, atr, sma, close
     )
Practical Debugging Patterns
Knowing the syntax is only half the battle. The following patterns show how to apply logging to solve real debugging problems in your Pine Script code.
Logging Variable Values on Each Bar
When debugging calculations, you often need to see how a value evolves bar by bar. Use barstate.isconfirmed to log only on confirmed bars and avoid duplicate messages from unconfirmed ticks.
//@version=6
indicator("Bar-by-bar logging", overlay = true)
float ema20 = ta.ema(close, 20)
float ema50 = ta.ema(close, 50)
float spread = ema20 - ema50
if barstate.isconfirmed
    log.info("EMA Spread: {0,number,#.#####}", spread)
Logging Strategy Entry and Exit Conditions
One of the most common debugging tasks is understanding why a strategy did or did not enter a trade. Log the individual conditions that make up your entry signal to see exactly which ones passed or failed.
//@version=6
strategy("Entry condition logging", overlay = true, margin_long = 100, margin_short = 100)
float rsi = ta.rsi(close, 14)
bool rsiCondition = rsi < 30
bool trendCondition = close > ta.sma(close, 200)
bool volumeCondition = volume > ta.sma(volume, 20)
bool entrySignal = rsiCondition and trendCondition and volumeCondition

if barstate.isconfirmed
    log.info(
         "Entry check:\nRSI<30: {0}\nAbove SMA200: {1}\nVolume spike: {2}\nFinal signal: {3}",
         rsiCondition, trendCondition, volumeCondition, entrySignal
     )

if entrySignal
    strategy.entry("Long", strategy.long)
This pattern reveals exactly which condition is preventing entries, saving you hours of guesswork.
Tracking Calculation Results
Complex indicators often chain multiple calculations together. Log intermediate results to verify that each step produces the expected output.
//@version=6
indicator("Calculation tracking", overlay = false)
float rawValue = ta.rsi(close, 14)
float smoothed = ta.ema(rawValue, 5)
float normalized = (smoothed - 30) / (70 - 30) * 100

if barstate.isconfirmed and bar_index % 50 == 0
    log.info(
         "Calculation chain:\nRaw RSI: {0,number,#.##}\nSmoothed: {1,number,#.##}\nNormalized: {2,number,#.##}",
         rawValue, smoothed, normalized
     )

plot(normalized, "Normalized RSI")
Monitoring request.security() Data
Multi-timeframe data from request.security() is a frequent source of bugs. Log the returned values to confirm they match your expectations.
//@version=6
indicator("Security data logging", overlay = true)
float dailyClose = request.security(syminfo.tickerid, "D", close)
float weeklyClose = request.security(syminfo.tickerid, "W", close)

if barstate.isconfirmed and barstate.islast
    log.info(
         "Multi-TF data:\nChart close: {0,number,#.##}\nDaily close: {1,number,#.##}\nWeekly close: {2,number,#.##}",
         close, dailyClose, weeklyClose
     )
Performance Considerations
Logging on every bar of a large dataset can generate thousands of messages and slow down your script. Follow these best practices to keep performance in check.
Log on Specific Bars Only
Use conditions to limit when logging occurs. The most common approach is to log only on confirmed bars with barstate.isconfirmed, which prevents duplicate messages from unconfirmed realtime ticks.4
//@version=6
indicator("Conditional logging", overlay = true)
float atr = ta.atr(14)
// Only log on confirmed bars
if barstate.isconfirmed
    log.info("ATR: {0,number,#.####}", atr)
Use Time-Based Filters
For long backtests, restrict logging to a specific date range using input.time() values. This lets you zero in on the exact bars that matter without generating noise across the entire dataset.
//@version=6
indicator("Time-filtered logging", overlay = true)
filterLogsInput = input.bool(true, "Filter logs by time")
logStartInput = input.time(timestamp("2025-01-01"), "Log start")
logEndInput = input.time(timestamp("2025-02-01"), "Log end")

bool inWindow = not filterLogsInput or (time >= logStartInput and time <= logEndInput)
float rsi = ta.rsi(close, 14)

if barstate.isconfirmed and inWindow
    log.info("RSI: {0,number,#.##}", rsi)
Log on Events, Not Every Bar
The most efficient approach is to log only when something meaningful happens, such as a crossover, a trade execution, or a threshold being crossed. This dramatically reduces the number of messages while keeping the information you actually need.
//@version=6
indicator("Event-based logging", overlay = true)
float rsi = ta.rsi(close, 14)
// Only log when RSI crosses key levels
if ta.crossover(rsi, 70)
    log.warning("RSI crossed above 70: {0,number,#.##}", rsi)
if ta.crossunder(rsi, 30)
    log.warning("RSI crossed below 30: {0,number,#.##}", rsi)
Complete Strategy Debugging Example
The following example brings all the patterns together into a complete strategy with strategic log placement at every decision point. This is the kind of logging setup you would use during development, then selectively remove or disable before publishing.
//@version=6
strategy("Debugged EMA Crossover", overlay = true, process_orders_on_close = true,
     margin_long = 100, margin_short = 100)

// Inputs
int fastLen = input.int(14, "Fast EMA Length")
int slowLen = input.int(28, "Slow EMA Length")
int bracketTicks = input.int(100, "SL/TP distance (ticks)")

// Calculations
float emaFast = ta.ema(close, fastLen)
float emaSlow = ta.ema(close, slowLen)
bool longCondition = ta.crossover(emaFast, emaSlow)
bool shortCondition = ta.crossunder(emaFast, emaSlow)

// Log entry conditions
if longCondition
    float limitLevel = close * 1.01
    log.info("Long signal on bar {0}. Fast EMA: {1,number,#.##}, Slow EMA: {2,number,#.##}",
         bar_index, emaFast, emaSlow)
    strategy.entry("Long", strategy.long)
    strategy.exit("Long Exit", "Long", profit = bracketTicks, loss = bracketTicks)
    log.info("Exit orders placed: TP and SL at {0} ticks from entry", bracketTicks)

if shortCondition
    log.info("Short signal on bar {0}. Fast EMA: {1,number,#.##}, Slow EMA: {2,number,#.##}",
         bar_index, emaFast, emaSlow)
    strategy.entry("Short", strategy.short)
    strategy.exit("Short Exit", "Short", profit = bracketTicks, loss = bracketTicks)

// Monitor open positions
if strategy.opentrades > 5
    log.warning("{0} open trades detected. Check pyramiding settings.", strategy.opentrades)

// Alert on significant drawdown
if strategy.equity < strategy.initial_capital * 0.8 and strategy.equity[1] >= strategy.initial_capital * 0.8
    log.error("Equity dropped below 80% of initial capital. Current equity: {0,number,currency}", strategy.equity)

// Log trade results when a trade closes
if ta.change(strategy.closedtrades) > 0
    int lastTrade = strategy.closedtrades - 1
    float entryP = strategy.closedtrades.entry_price(lastTrade)
    float exitP = strategy.closedtrades.exit_price(lastTrade)
    float pnl = strategy.closedtrades.profit(lastTrade)
    log.info("Trade closed. Entry: {0,number,#.##}, Exit: {1,number,#.##}, P&L: {2,number,currency}",
         entryP, exitP, pnl)

// Plot EMAs for visual reference
plot(emaFast, "Fast EMA", color.blue)
plot(emaSlow, "Slow EMA", color.red)
This strategy logs at five key points: when a long signal fires, when a short signal fires, when too many positions accumulate, when drawdown hits a critical level, and when each trade closes. During development, you see a complete audit trail. Before going live, you can remove the info messages and keep only the warnings and errors.
Before and After: v5 Hacks vs v6 Logging
To illustrate just how much cleaner the v6 approach is, here is the same debugging task done both ways.
v5: Debug with Plots and Labels
//@version=5
indicator("v5 Debug Hack", overlay = true)
float rsi = ta.rsi(close, 14)
float atr = ta.atr(14)
// Hack: plot values to see them
plot(rsi, "RSI", color.orange, display = display.data_window)
plot(atr, "ATR", color.purple, display = display.data_window)
// Hack: label for crossover events
if ta.crossover(rsi, 70)
    label.new(bar_index, high, "RSI overbought\n" + str.tostring(rsi, "#.##"),
         style = label.style_label_down, color = color.red, textcolor = color.white)
if ta.crossunder(rsi, 30)
    label.new(bar_index, low, "RSI oversold\n" + str.tostring(rsi, "#.##"),
         style = label.style_label_up, color = color.green, textcolor = color.white)
v6: Clean Runtime Logging
//@version=6
indicator("v6 Clean Logging", overlay = true)
float rsi = ta.rsi(close, 14)
float atr = ta.atr(14)
// Clean: log values to Pine Logs pane
if barstate.isconfirmed
    log.info("RSI: {0,number,#.##}, ATR: {1,number,#.#####}", rsi, atr)
// Clean: log crossover events with context
if ta.crossover(rsi, 70)
    log.warning("RSI overbought at {0,number,#.##} on bar {1}", rsi, bar_index)
if ta.crossunder(rsi, 30)
    log.warning("RSI oversold at {0,number,#.##} on bar {1}", rsi, bar_index)
The v6 version does not add any visual clutter to the chart. All debug output goes to the Pine Logs pane, where you can filter it, search it, and click entries to navigate to specific bars. Labels and extra plots are no longer needed just to see what your code is doing.
Automate Your Strategies
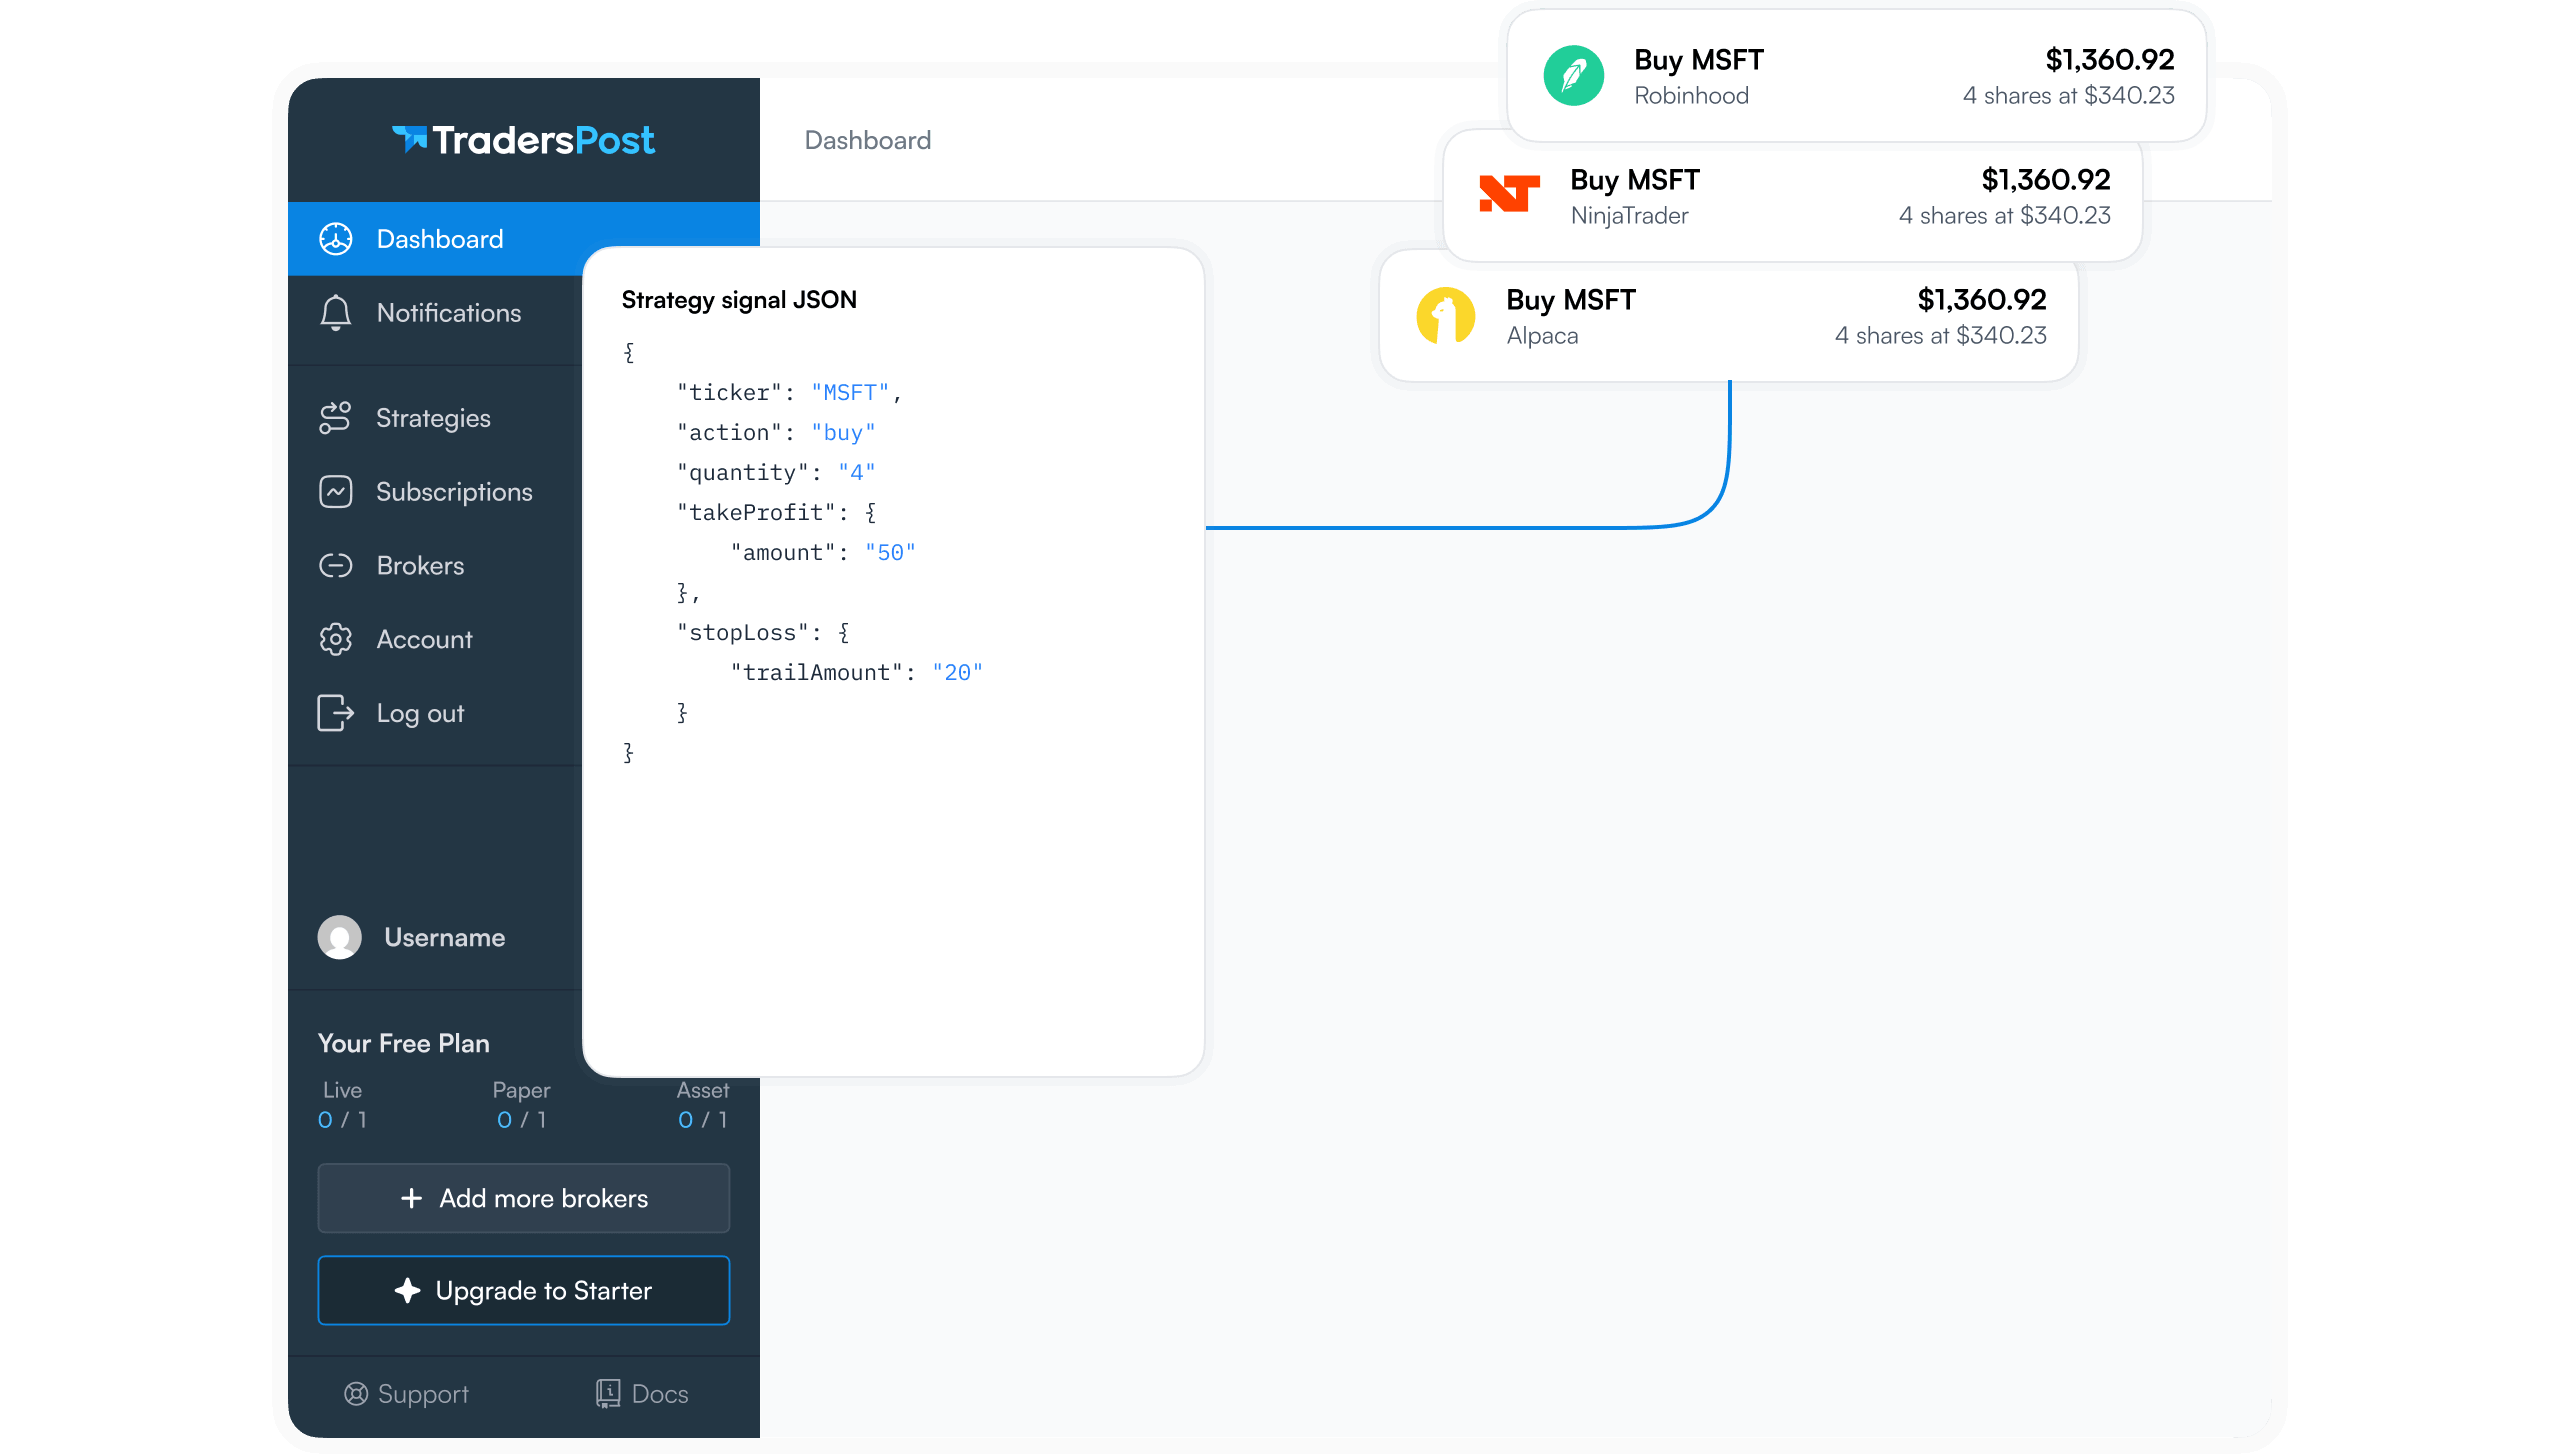
Once you have used Pine Script v6 logging to debug and validate your strategy, the next step is to automate it. TradersPost connects your TradingView strategies to supported brokers so your alerts can execute real trades automatically.5 You can use TradingView alerts to send webhook signals to TradersPost, which then routes orders to your brokerage account.
With the confidence that comes from thoroughly debugging your Pine Script strategies using the new logging system, you can automate with greater peace of mind knowing your entry and exit logic has been verified at every step.
Visit TradersPost to connect your TradingView strategies to live and paper trading accounts across stocks, options, futures, and crypto.
References
1 Pine Script Release Notes
2 Pine Script v5 to v6 Migration Guide
3 Pine Script v6 Language Reference
4 Pine Script User Manual
5 TradersPost - Automated Trading Platform