Trade the Point of Control with Pine Script Footprint
How to build a Point of Control and Value Area trading strategy in Pine Script using v6 footprint data for volume-based entries and exits.

Marketing
Reviewed by Mike Christensen
Fact-checked by Mike Christensen

Bottom Line
- Build a strategy that enters long when price crosses above the previous bar POC and short when it crosses below
- Use Value Area High and Low as take-profit and stop-loss levels for volume-anchored risk management
- The footprint delta helps confirm trade direction with positive delta supporting longs and negative delta supporting shorts
- Requires TradingView Premium or Ultimate plan for request.footprint() data access
Most trading strategies base their entries on price action alone. Moving average crossovers, breakout levels, and oscillator thresholds all use price as the sole input. But price tells you where the market went, not where the most participation occurred. Volume profile data reveals the price levels where traders actually committed capital, and the Point of Control and Value Area are the two most important levels in that data.
Pine Script v6 introduced the request.footprint() function in January 2026, giving script developers direct access to volume footprint data including the POC, Value Area High, Value Area Low, and per-row volume delta1. This tutorial builds a complete trading strategy that uses these volume-based levels for entries, exits, and trade confirmation.
What POC and Value Area Are
Volume profile analysis breaks each bar's total volume into rows at specific price levels. Instead of a single volume number for the entire bar, you see exactly how much trading happened at each price within that bar's range.
Point of Control (POC): The price row with the highest total volume in the bar's footprint2. This is where the most trading activity occurred and represents the consensus "fair value" for that bar. Price tends to gravitate toward the POC because it is the level where both buyers and sellers agreed to transact most heavily.
Value Area: The range of price rows that account for a specified percentage (typically 70%) of the bar's total volume2. The top of this range is the Value Area High (VAH) and the bottom is the Value Area Low (VAL). The Value Area represents where the majority of the bar's trading activity took place.
Volume Delta: The difference between buy volume and sell volume at a given price level or for the entire bar2. Positive delta means buyers were more aggressive. Negative delta means sellers dominated. Delta confirms the direction of commitment behind a price move.
Professional futures and equities traders have used these concepts for decades through market profile and volume profile charts. The request.footprint() function brings this analysis directly into Pine Script code3.
Why Volume Levels Matter
Price-based support and resistance levels are subjective. Different traders draw them at different places, and they have no built-in measure of significance. Volume-based levels are objective and quantitative. A POC at $150.25 means more contracts or shares changed hands at that exact price than at any other price in the bar. A Value Area between $149.80 and $150.60 means 70% of all volume traded within that range.
These levels matter for trading because they represent where institutional participants were active. When price returns to the previous bar's POC, it is returning to a level of proven interest. When price breaks through the Value Area boundaries, it is moving away from the zone of agreement into uncharted territory where conviction was lower.
Step 1: Request Footprint Data
The request.footprint() function returns a footprint object containing all the volume profile data for the current bar3. It takes three parameters: the number of ticks per row, the Value Area percentage, and the imbalance detection percentage.
//@version=6
strategy("POC Value Area Strategy", overlay = true, margin_long = 100, margin_short = 100)

// --- Inputs ---
int   ticksPerRowInput  = input.int(10, "Ticks Per Row", minval = 1, tooltip = "Price range of each footprint row in ticks. Smaller values give finer granularity but require more data.")
int   vaPercentInput    = input.int(70, "Value Area %", minval = 50, maxval = 95, tooltip = "Percentage of total volume that defines the Value Area")
bool  useDeltaInput     = input.bool(true, "Use Delta Confirmation", tooltip = "Require positive delta for longs and negative delta for shorts")
float qtyInput          = input.float(1.0, "Order Quantity", minval = 0.01, step = 0.01)

// --- Request footprint data ---
footprint fp = request.footprint(ticksPerRowInput, vaPercentInput)
The request.footprint() call returns either a valid footprint object or na if no footprint data is available for the current bar3. Footprint data requires a TradingView Premium or Ultimate subscription1. On lower-tier plans the function returns na on every bar.
The ticksPerRowInput controls the granularity of the volume distribution. A value of 10 means each row covers 10 ticks of price range. Smaller values create a more detailed profile but require more processing. The vaPercentInput sets what percentage of total volume defines the Value Area, with 70% being the standard used by most volume profile traders.
Step 2: Extract Previous Bar POC
The strategy uses the previous bar's POC as the reference level for the current bar's entries. Using the current bar's POC would be forward-looking because the footprint builds as the bar progresses. The previous bar's POC is a fixed, known level by the time the current bar opens.
// --- Extract footprint levels from previous bar ---
volume_row pocRow = footprint.poc(fp)
volume_row vahRow = footprint.vah(fp)
volume_row valRow = footprint.val(fp)

// --- Get price levels ---
float pocPrice = na(pocRow) ? na : (pocRow.up_price() + pocRow.down_price()) / 2.0
float vahPrice = na(vahRow) ? na : vahRow.up_price()
float valPrice = na(valRow) ? na : valRow.down_price()

// --- Use previous bar's levels for current bar decisions ---
float prevPOC = pocPrice[1]
float prevVAH = vahPrice[1]
float prevVAL = valPrice[1]

// --- Get delta for confirmation ---
float barDelta = footprint.delta(fp)
float prevDelta = barDelta[1]
The footprint.poc() function returns a volume_row object for the POC row3. To get a single price level, we average the row's upper and lower price boundaries using up_price() and down_price(). For the VAH we use the upper boundary of the highest Value Area row, and for the VAL we use the lower boundary of the lowest Value Area row3. This gives the full Value Area range from bottom to top.
All values are shifted by one bar with the [1] operator so the strategy references completed, fixed levels rather than the still-building current bar data.
Step 3: Define Entry Rules
The entry logic is based on price crossing the previous bar's POC level. When price crosses above the POC, it suggests bullish sentiment as the market moves above the previous bar's fair value. When price crosses below the POC, it suggests bearish sentiment.
// --- Entry conditions ---
bool longCondition  = ta.crossover(close, prevPOC)
bool shortCondition = ta.crossunder(close, prevPOC)

// --- Apply delta confirmation if enabled ---
if useDeltaInput
    longCondition  := longCondition and prevDelta > 0
    shortCondition := shortCondition and prevDelta < 0
The ta.crossover() function returns true when the close price crosses above the prevPOC level from below3. The ta.crossunder() function returns true when close crosses below prevPOC from above3. These are standard Pine Script crossing functions applied to volume-based levels instead of moving averages.
The optional delta confirmation filter adds a second requirement. For a long entry, the previous bar's overall delta must be positive, confirming that buyers were the dominant force. For a short entry, the delta must be negative, confirming seller dominance. This filter reduces false signals where price crosses the POC against the prevailing order flow.
Step 4: Use Value Area Levels for Exits
The Value Area High and Low provide natural take-profit and stop-loss levels because they represent the boundaries of the previous bar's primary trading zone. For long trades, the VAH is a logical profit target because it marks the upper limit of the high-volume zone. The VAL serves as a stop-loss because a break below it means price has left the area of consensus to the downside.
// --- Execute entries ---
if longCondition and not na(prevPOC) and not na(prevVAH) and not na(prevVAL)
    strategy.entry("Long", strategy.long, qty = qtyInput)
    strategy.exit("Long Exit", from_entry = "Long", limit = prevVAH, stop = prevVAL)

if shortCondition and not na(prevPOC) and not na(prevVAH) and not na(prevVAL)
    strategy.entry("Short", strategy.short, qty = qtyInput)
    strategy.exit("Short Exit", from_entry = "Short", limit = prevVAL, stop = prevVAH)
For long trades, the strategy.exit() call sets a limit order at prevVAH (take-profit) and a stop order at prevVAL (stop-loss)3. For short trades, the levels are reversed: take-profit at prevVAL and stop-loss at prevVAH. The na checks ensure the strategy only enters when all three footprint levels are available.
This creates a volume-anchored risk management framework. The distance between the POC and the VAL is your risk on a long trade. The distance between the POC and the VAH is your reward. The risk-reward ratio is determined by where the POC sits within the Value Area, which varies from bar to bar based on actual volume distribution.
Step 5: Add Delta Confirmation Filter
Beyond gating entries, delta can also provide additional visual information on the chart. Plotting the delta alongside the strategy helps traders understand the conviction behind each move and evaluate whether the entry conditions were well-supported.
// --- Visual overlays ---
plot(prevPOC, "Previous POC", color.orange, 2, plot.style_stepline)
plot(prevVAH, "Previous VAH", color.new(color.teal, 50), 1, plot.style_stepline)
plot(prevVAL, "Previous VAL", color.new(color.red, 50), 1, plot.style_stepline)

// --- Delta background ---
color deltaColor = prevDelta > 0 ? color.new(color.teal, 92) : prevDelta < 0 ? color.new(color.red, 92) : na
bgcolor(deltaColor, title = "Delta Direction")
The POC plots as a solid orange step line so you can see the level the strategy references for entries. The VAH and VAL plot as lighter step lines showing the exit targets. The background color shifts between a faint green for positive delta bars and a faint red for negative delta bars, giving a quick visual read on order flow direction.
Complete Strategy Code
Here is the full strategy combining all five steps. Copy this into the Pine Editor and apply it to any chart with a TradingView Premium or Ultimate subscription.
//@version=6
strategy("POC Value Area Strategy", overlay = true, margin_long = 100, margin_short = 100)

// --- Inputs ---
int   ticksPerRowInput  = input.int(10, "Ticks Per Row", minval = 1, group = "Footprint Settings", tooltip = "Price range of each footprint row in ticks")
int   vaPercentInput    = input.int(70, "Value Area %", minval = 50, maxval = 95, group = "Footprint Settings", tooltip = "Percentage of total volume that defines the Value Area")
bool  useDeltaInput     = input.bool(true, "Use Delta Confirmation", group = "Strategy Settings", tooltip = "Require matching delta direction for entries")
float qtyInput          = input.float(1.0, "Order Quantity", minval = 0.01, step = 0.01, group = "Strategy Settings")

// --- Request footprint data ---
footprint fp = request.footprint(ticksPerRowInput, vaPercentInput)

// --- Extract footprint levels ---
volume_row pocRow = footprint.poc(fp)
volume_row vahRow = footprint.vah(fp)
volume_row valRow = footprint.val(fp)

// --- Get price levels ---
float pocPrice = na(pocRow) ? na : (pocRow.up_price() + pocRow.down_price()) / 2.0
float vahPrice = na(vahRow) ? na : vahRow.up_price()
float valPrice = na(valRow) ? na : valRow.down_price()

// --- Use previous bar's levels ---
float prevPOC   = pocPrice[1]
float prevVAH   = vahPrice[1]
float prevVAL   = valPrice[1]
float prevDelta = footprint.delta(fp)[1]

// --- Entry conditions ---
bool longCondition  = ta.crossover(close, prevPOC)
bool shortCondition = ta.crossunder(close, prevPOC)

// --- Apply delta confirmation if enabled ---
if useDeltaInput
    longCondition  := longCondition and prevDelta > 0
    shortCondition := shortCondition and prevDelta < 0

// --- Execute entries with VA exits ---
if longCondition and not na(prevPOC) and not na(prevVAH) and not na(prevVAL)
    strategy.entry("Long", strategy.long, qty = qtyInput)
    strategy.exit("Long Exit", from_entry = "Long", limit = prevVAH, stop = prevVAL)

if shortCondition and not na(prevPOC) and not na(prevVAH) and not na(prevVAL)
    strategy.entry("Short", strategy.short, qty = qtyInput)
    strategy.exit("Short Exit", from_entry = "Short", limit = prevVAL, stop = prevVAH)

// --- Visual overlays ---
plot(prevPOC, "Previous POC", color.orange, 2, plot.style_stepline)
plot(prevVAH, "Previous VAH", color.new(color.teal, 50), 1, plot.style_stepline)
plot(prevVAL, "Previous VAL", color.new(color.red, 50), 1, plot.style_stepline)

// --- Delta background ---
color deltaColor = prevDelta > 0 ? color.new(color.teal, 92) : prevDelta < 0 ? color.new(color.red, 92) : na
bgcolor(deltaColor, title = "Delta Direction")
Backtesting Considerations
Before trusting any strategy results, you need to understand the nuances of backtesting a footprint-based strategy.
Data Availability
Footprint data is not available for all instruments or all historical periods. The request.footprint() function returns na when data is unavailable3. On instruments without tick-level volume data, the strategy will not generate any trades. Always verify that your target instrument has footprint data by checking whether the POC plot displays values before evaluating backtest results.
Ticks Per Row Sensitivity
The ticks per row setting significantly affects where the POC and Value Area boundaries fall. A coarse setting like 50 ticks per row creates broad rows where the POC represents a wide price range. A fine setting like 5 ticks per row creates narrow rows with precise POC levels but may be more sensitive to noise. There is no universally correct value. Test multiple settings on your specific instrument and timeframe to find the balance between precision and stability.
Timeframe Selection
This strategy works best on timeframes where each bar contains meaningful volume distribution. On very short timeframes like 1-minute charts, each bar may not have enough ticks to produce a reliable volume profile. On daily or weekly charts, the Value Area may be too wide to provide actionable exit levels. Intraday timeframes between 5 minutes and 1 hour are a reasonable starting point for most instruments.
Slippage and Commissions
Because the entry occurs at a crossing event and the exits use limit and stop orders, actual fills may differ from backtest assumptions. Add realistic slippage and commission values to the strategy settings before drawing conclusions. In the strategy() declaration, you can add parameters like slippage = 2, commission_type = strategy.commission.cash_per_contract, commission_value = 1.50 to model real-world execution costs3.
Subscription Requirement
The request.footprint() function requires a TradingView Premium or Ultimate subscription1. A script that works on an account with the required subscription tier will not function on a lower-tier account. If you publish this strategy on TradingView, make sure to document this requirement clearly so users understand why the strategy may not generate trades on their accounts.
Automating With TradersPost
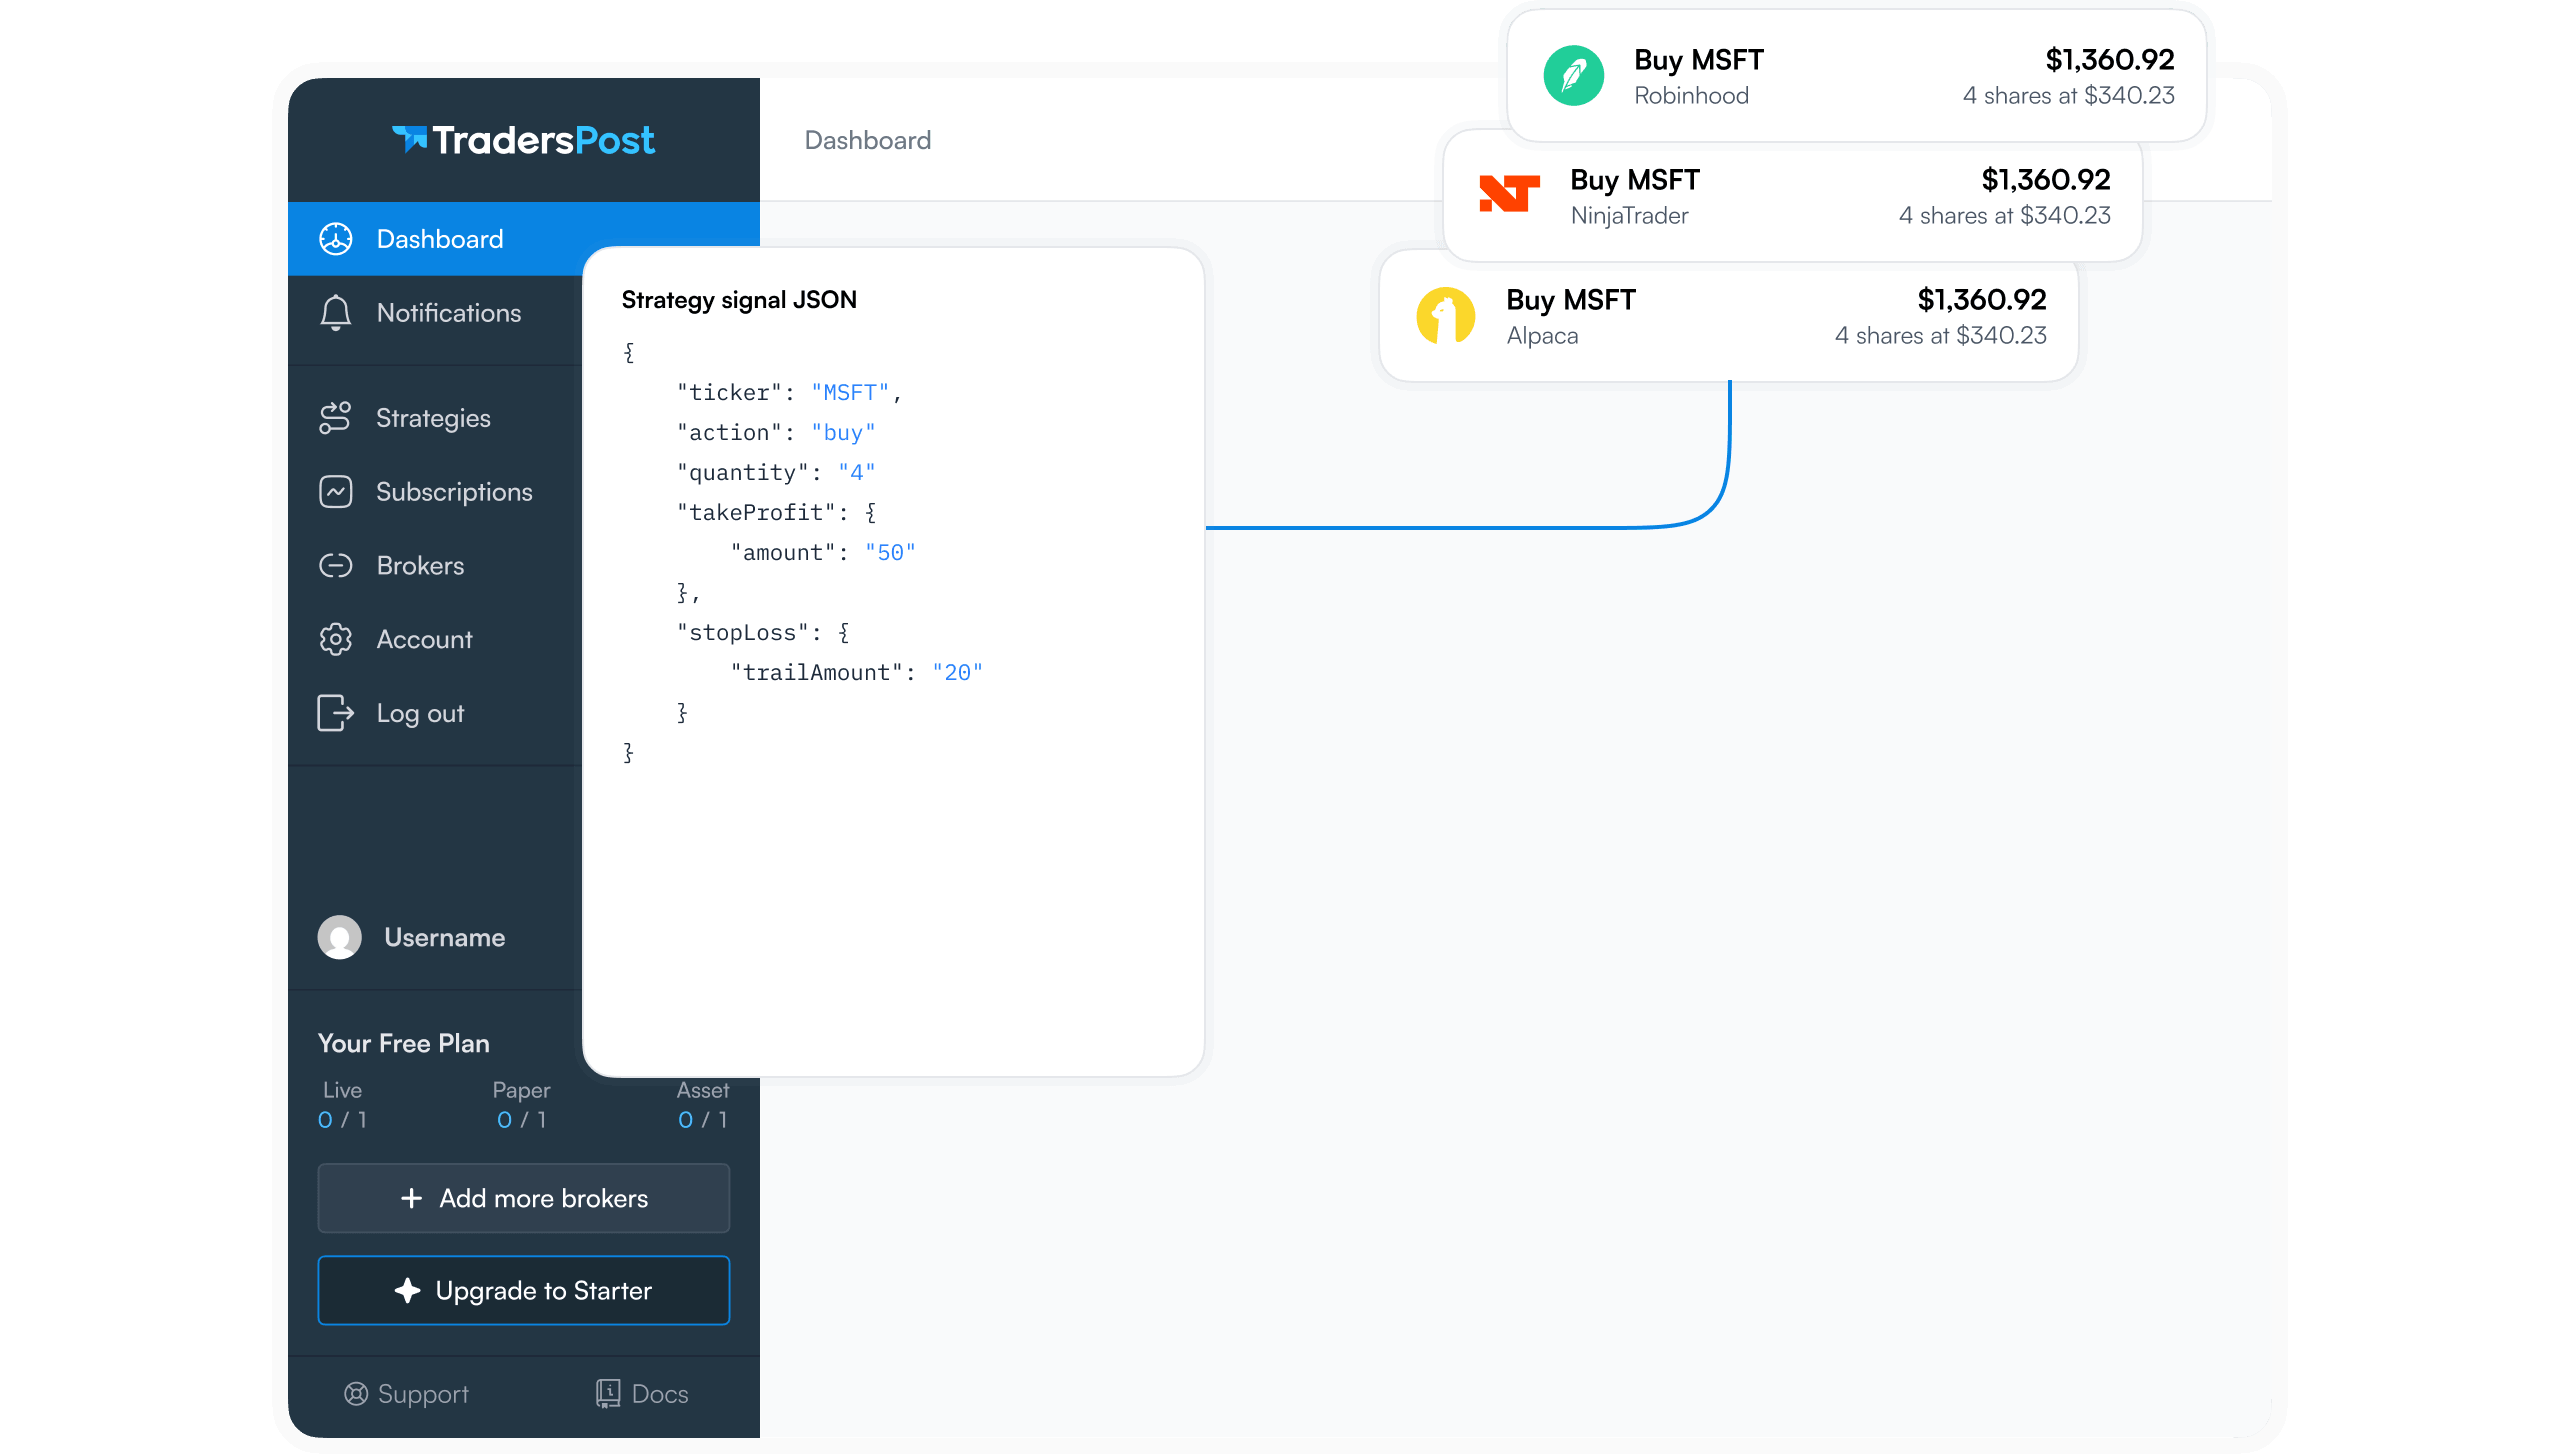
Once you have validated the strategy through backtesting and are ready to trade it live, you can automate execution through TradersPost5. The connection between TradingView and TradersPost uses webhook alerts.
Setting Up the Webhook
Convert the strategy to use alert messages that TradersPost can interpret. Add alert_message parameters to the strategy.entry() and strategy.exit() calls with the JSON payload format that TradersPost expects5. When the strategy generates an entry or exit signal, TradingView fires the alert, which hits your TradersPost webhook URL and routes the order to your connected broker.
Why This Strategy Suits Automation
Volume-based strategies like this one are particularly well-suited for automation because the levels are objective and calculated from data rather than subjective chart analysis. The POC, VAH, and VAL are exact numbers derived from actual volume distribution. The entry and exit levels are clearly defined before the trade is entered. There is no discretionary element that requires a human to interpret ambiguous patterns.
TradersPost supports the order types this strategy generates: market entries on crossover signals and limit/stop exits at defined price levels5. The automation layer simply executes the orders the strategy specifies, with the same logic that produced the backtest results.
Risk Management
When running any automated strategy, set position sizing limits in TradersPost that match your risk tolerance5. The Value Area provides built-in risk boundaries, but you should also configure maximum position sizes and daily loss limits in your TradersPost subscription settings as an additional safety layer.
Key Takeaways
The Point of Control and Value Area are volume-based price levels that represent where the most trading activity occurred. Using Pine Script v6's request.footprint() function, you can build strategies that enter trades when price crosses the previous bar's POC and exit at Value Area boundaries3. Adding delta confirmation filters out entries that lack order flow support. This approach produces strategies with entries and exits anchored to objective volume data rather than arbitrary price-based indicators. Combined with TradersPost automation, the strategy can execute trades automatically with the same precision as the backtest logic5.
References
1 Pine Script Release Notes
2 Pine Script User Manual
3 Pine Script v6 Language Reference
4 Pine Script v5 to v6 Migration Guide
5 TradersPost