Getting Started with TradersPost for Automated Trading
Complete beginner's guide to setting up TradersPost, connecting webhooks, creating strategies, and automating your first trades from TradingView or custom signals.

Marketing

TradersPost is an automation platform that connects your trading signals to real brokers, allowing you to execute trades automatically based on alerts from TradingView, custom indicators, or your own coded strategies. This comprehensive guide walks you through the complete setup process, from creating your first webhook to executing your first automated trade.
Understanding the TradersPost Architecture
Before diving into setup, it's important to understand how TradersPost works. The platform acts as a bridge between signal sources (like TradingView) and your broker accounts. When a trading signal triggers, it sends a message to a TradersPost webhook URL. TradersPost receives this message, processes it according to your strategy rules, and then forwards the order to your connected broker.
This architecture provides several advantages. First, it separates signal generation from order execution, allowing you to test and refine signals without risking capital. Second, it enables one signal to control multiple broker accounts simultaneously, useful for managing family accounts or offering signals to subscribers. Third, it provides a centralized dashboard for monitoring all your automated trading activity.
Creating Your TradersPost Account
Start by signing up for a free TradersPost account. The platform offers a trial period that includes access to a paper trading account with simulated capital. This paper account is perfect for testing your strategies before committing real money. After creating your account, you'll land on the dashboard, which displays your connected accounts, active strategies, and recent trade activity.
The paper broker account comes preloaded with $100,000 in virtual capital. This allows you to fully test the automation workflow without any financial risk. You can create and receive signals, process orders, and see exactly how the system behaves under various market conditions.
Creating Your First Webhook
Webhooks are the entry points for trading signals into TradersPost. Think of a webhook as a unique URL that listens for incoming messages. When a signal arrives at this URL, TradersPost processes it and takes the appropriate action based on your strategy configuration.
To create a webhook, navigate to the Strategies menu at the top of the dashboard and select Webhooks. Click the "New Webhook" button to open the creation dialog. Give your webhook a descriptive name that identifies its purpose, such as "TradingView MACD Strategy" or "Custom Python Signals."
In the configuration options, you can choose whether to allow any ticker symbol or restrict the webhook to specific symbols. For testing purposes, it's usually best to allow any ticker. You can also restrict which sources can send signals to this webhook. For example, you might want only TradingView to access certain webhooks, or you might want to limit access to specific IP addresses if you're sending signals from a private server.
For most use cases, leaving the webhook open to all sources is appropriate, especially when starting out. Click "Save" to create the webhook. TradersPost will generate a unique URL for this webhook, which you'll use later when configuring your signal source.
Creating a Strategy
Strategies in TradersPost define the rules for how signals are processed and executed. A strategy is what users actually subscribe to, and it's where you'll define position sizing, order types, and other execution parameters.
From the strategies menu, click "Create New Strategy." Give your strategy a clear name that describes what it does, such as "Mean Reversion Day Trading" or "Momentum Breakout System." You can add optional fields like description, strategy goals, and risk parameters to help document your approach.
The crucial step is associating your strategy with the webhook you created earlier. Use the dropdown menu to select the webhook that will feed signals into this strategy. This connection ensures that when signals arrive at your webhook URL, they're processed according to the rules defined in this strategy.
Save your strategy to make it active. At this point, you have a webhook ready to receive signals and a strategy ready to process them, but you haven't connected them to any broker yet.
Creating a Subscription
Subscriptions are how you connect strategies to broker accounts. A single strategy can have multiple subscriptions, each connected to a different broker account. This is how TradersPost enables signal providers to serve multiple clients or how individual traders can manage multiple accounts with one set of signals.
From your strategy detail page, click "Create Subscription." You'll see a list of all broker accounts you've connected to TradersPost. For your first test, select the paper broker account that was created automatically when you signed up.
This creates a new subscription in a disabled state. Before enabling it, you need to configure how it will handle incoming signals.
Configuring Subscription Settings
Subscription configuration is where you define the specific execution parameters for this strategy-broker combination. The settings here override or complement the signal instructions, giving you fine-grained control over risk and execution.
The first important setting is "Auto Submit." When this is unchecked, incoming signals will appear in your inbox for manual review before being sent to the broker. This is excellent for testing and building confidence in your system. You can review each signal, verify it makes sense, and then approve or reject it. Once you're comfortable with how the strategy performs, you can enable Auto Submit to fully automate the process.
Next, configure the trading direction. You can choose to take long positions only, short positions only, or both. For strategies designed specifically for long or short setups, restricting the direction prevents unintended trades if signals cross directions unexpectedly.
The ticker restriction setting lets you limit which symbols this subscription can trade. You might allow any ticker if your strategy is designed to work across multiple instruments, or you might restrict it to specific symbols for focused strategies.
Position Sizing Configuration
Position sizing determines how much capital to allocate to each trade. TradersPost offers several methods for calculating position size, each suited to different trading styles and risk management approaches.
The most straightforward method is percentage of portfolio value. If you set this to 10%, each new position will allocate 10% of your total account value. For a $100,000 account, that's $10,000 per position. This method automatically scales your position size as your account grows or shrinks.
You can also use fixed dollar amounts, which allocate a specific amount of capital to each trade regardless of account size. Fixed share quantities work well for trading specific numbers of contracts or shares. Risk-based sizing calculates position size based on the distance to your stop loss, ensuring each trade risks the same percentage of capital.
For testing purposes, start with percentage of portfolio value set to a conservative level like 5-10%. This ensures you can take multiple positions without over-leveraging the account.
Order Type Configuration
TradersPost supports various order types for entering and exiting positions. Market orders execute immediately at the best available price, providing certainty of execution but not price certainty. Limit orders execute only at your specified price or better, providing price certainty but not execution certainty.
For automated strategies, market orders are often preferred for entries because they ensure you get into the position when your signal triggers. The slippage on market orders is usually minimal for liquid stocks and ETFs. However, for less liquid instruments or during volatile periods, consider using limit orders with a small buffer above (for buys) or below (for sells) the current market price.
Exit order types deserve careful consideration. Market exits ensure you get out of positions quickly, which is important for risk management. However, limit exits can sometimes capture better prices, especially when exiting profitable positions where urgency is lower.
Setting Up Take Profit and Stop Loss
Risk management parameters like take profit and stop loss levels can be defined at the subscription level or sent dynamically with each signal. For simplicity when starting out, you might skip these at the subscription level and instead rely on exit signals from your strategy.
However, having broker-level stop losses provides a safety net. If your signal source fails or loses connectivity, a stop loss at the broker will still protect you from runaway losses. Many experienced automated traders use both: they set wide stop losses at the broker as disaster protection while relying on tighter, signal-driven stops for normal trade management.
Testing with Manual Signals
Before connecting a live signal source like TradingView, test the complete workflow manually. TradersPost provides a "Send Request" feature in the webhook detail view that lets you manually send test signals.
Click on your webhook and select "Send Request" from the top right. This opens a dialog where you can construct a test signal. Choose whether to send a buy or sell signal, specify a ticker symbol, and set a price. Make sure the "Test" checkbox is unchecked so the signal actually triggers trades for subscribers.
Send the buy signal and watch what happens. If you have Auto Submit disabled, the signal will appear in your inbox at the top of the dashboard. The inbox counter will increment to show you have pending signals. Click into the inbox to review the signal details.
Reviewing and Approving Signals
In the inbox, you'll see the signal that just arrived, including all its details: the ticker symbol, the action (buy or sell), the price at the time of the signal, and the calculated quantity based on your position sizing rules. The status history shows the signal's lifecycle from receipt to current state.
Because you configured market entry orders, the order type will be "Market Buy." The system has calculated how many shares to purchase based on your 10% of portfolio value setting. For a $100,000 account with 10% allocation, it might buy approximately 39 shares of a stock trading around $254, totaling close to $10,000.
Click "Approve" to execute the trade. TradersPost will immediately submit the order to the paper broker. Within seconds, you'll see the status update to show the order was filled. The position is now open in your broker account.
Monitoring Open Positions
Navigate to your broker account view by hovering over "Brokers" in the top menu and selecting your paper account. Here you'll see all open positions, including the one you just entered. The position will show the ticker symbol, quantity, entry price, current price, and unrealized profit or loss.
The order history shows all executed orders, including fills, partial fills, and any orders that were rejected or cancelled. This provides a complete audit trail of your automated trading activity.
Closing Positions with Exit Signals
To close the position you just opened, send a sell signal through your webhook. Return to the webhook detail page and use "Send Request" again, this time selecting "Sell" as the action. Use the same ticker symbol as your open position.
When you have an open long position and send a sell signal, TradersPost interprets this as an exit order. It will close the entire position by selling all shares. Because you enabled Auto Submit after your initial test, this exit signal will process automatically without requiring inbox approval.
After sending the sell signal, check your broker account again. You'll see the position has been closed, and you'll have a new order in the order history showing the exit execution. Your account balance will reflect any gain or loss from the trade.
Connecting TradingView Strategies
Now that you understand the workflow, you're ready to connect real signal sources. TradingView is the most common source for TradersPost users, offering both built-in strategies and custom Pine Script indicators.
To connect TradingView, you'll create alerts that send messages to your TradersPost webhook URL. Open TradingView and load a chart with your chosen strategy. Click the alerts panel and select "Create Alert."
In the alert dialog, choose your strategy as the condition source. Select whether this is a buy or sell signal based on your strategy logic. Under the webhook URL field, paste the webhook URL from your TradersPost webhook detail page.
This webhook URL is sensitive information. Anyone with access to this URL can send trades to your TradersPost account. Keep it private and never share it publicly or commit it to public code repositories.
Configuring Alert Messages
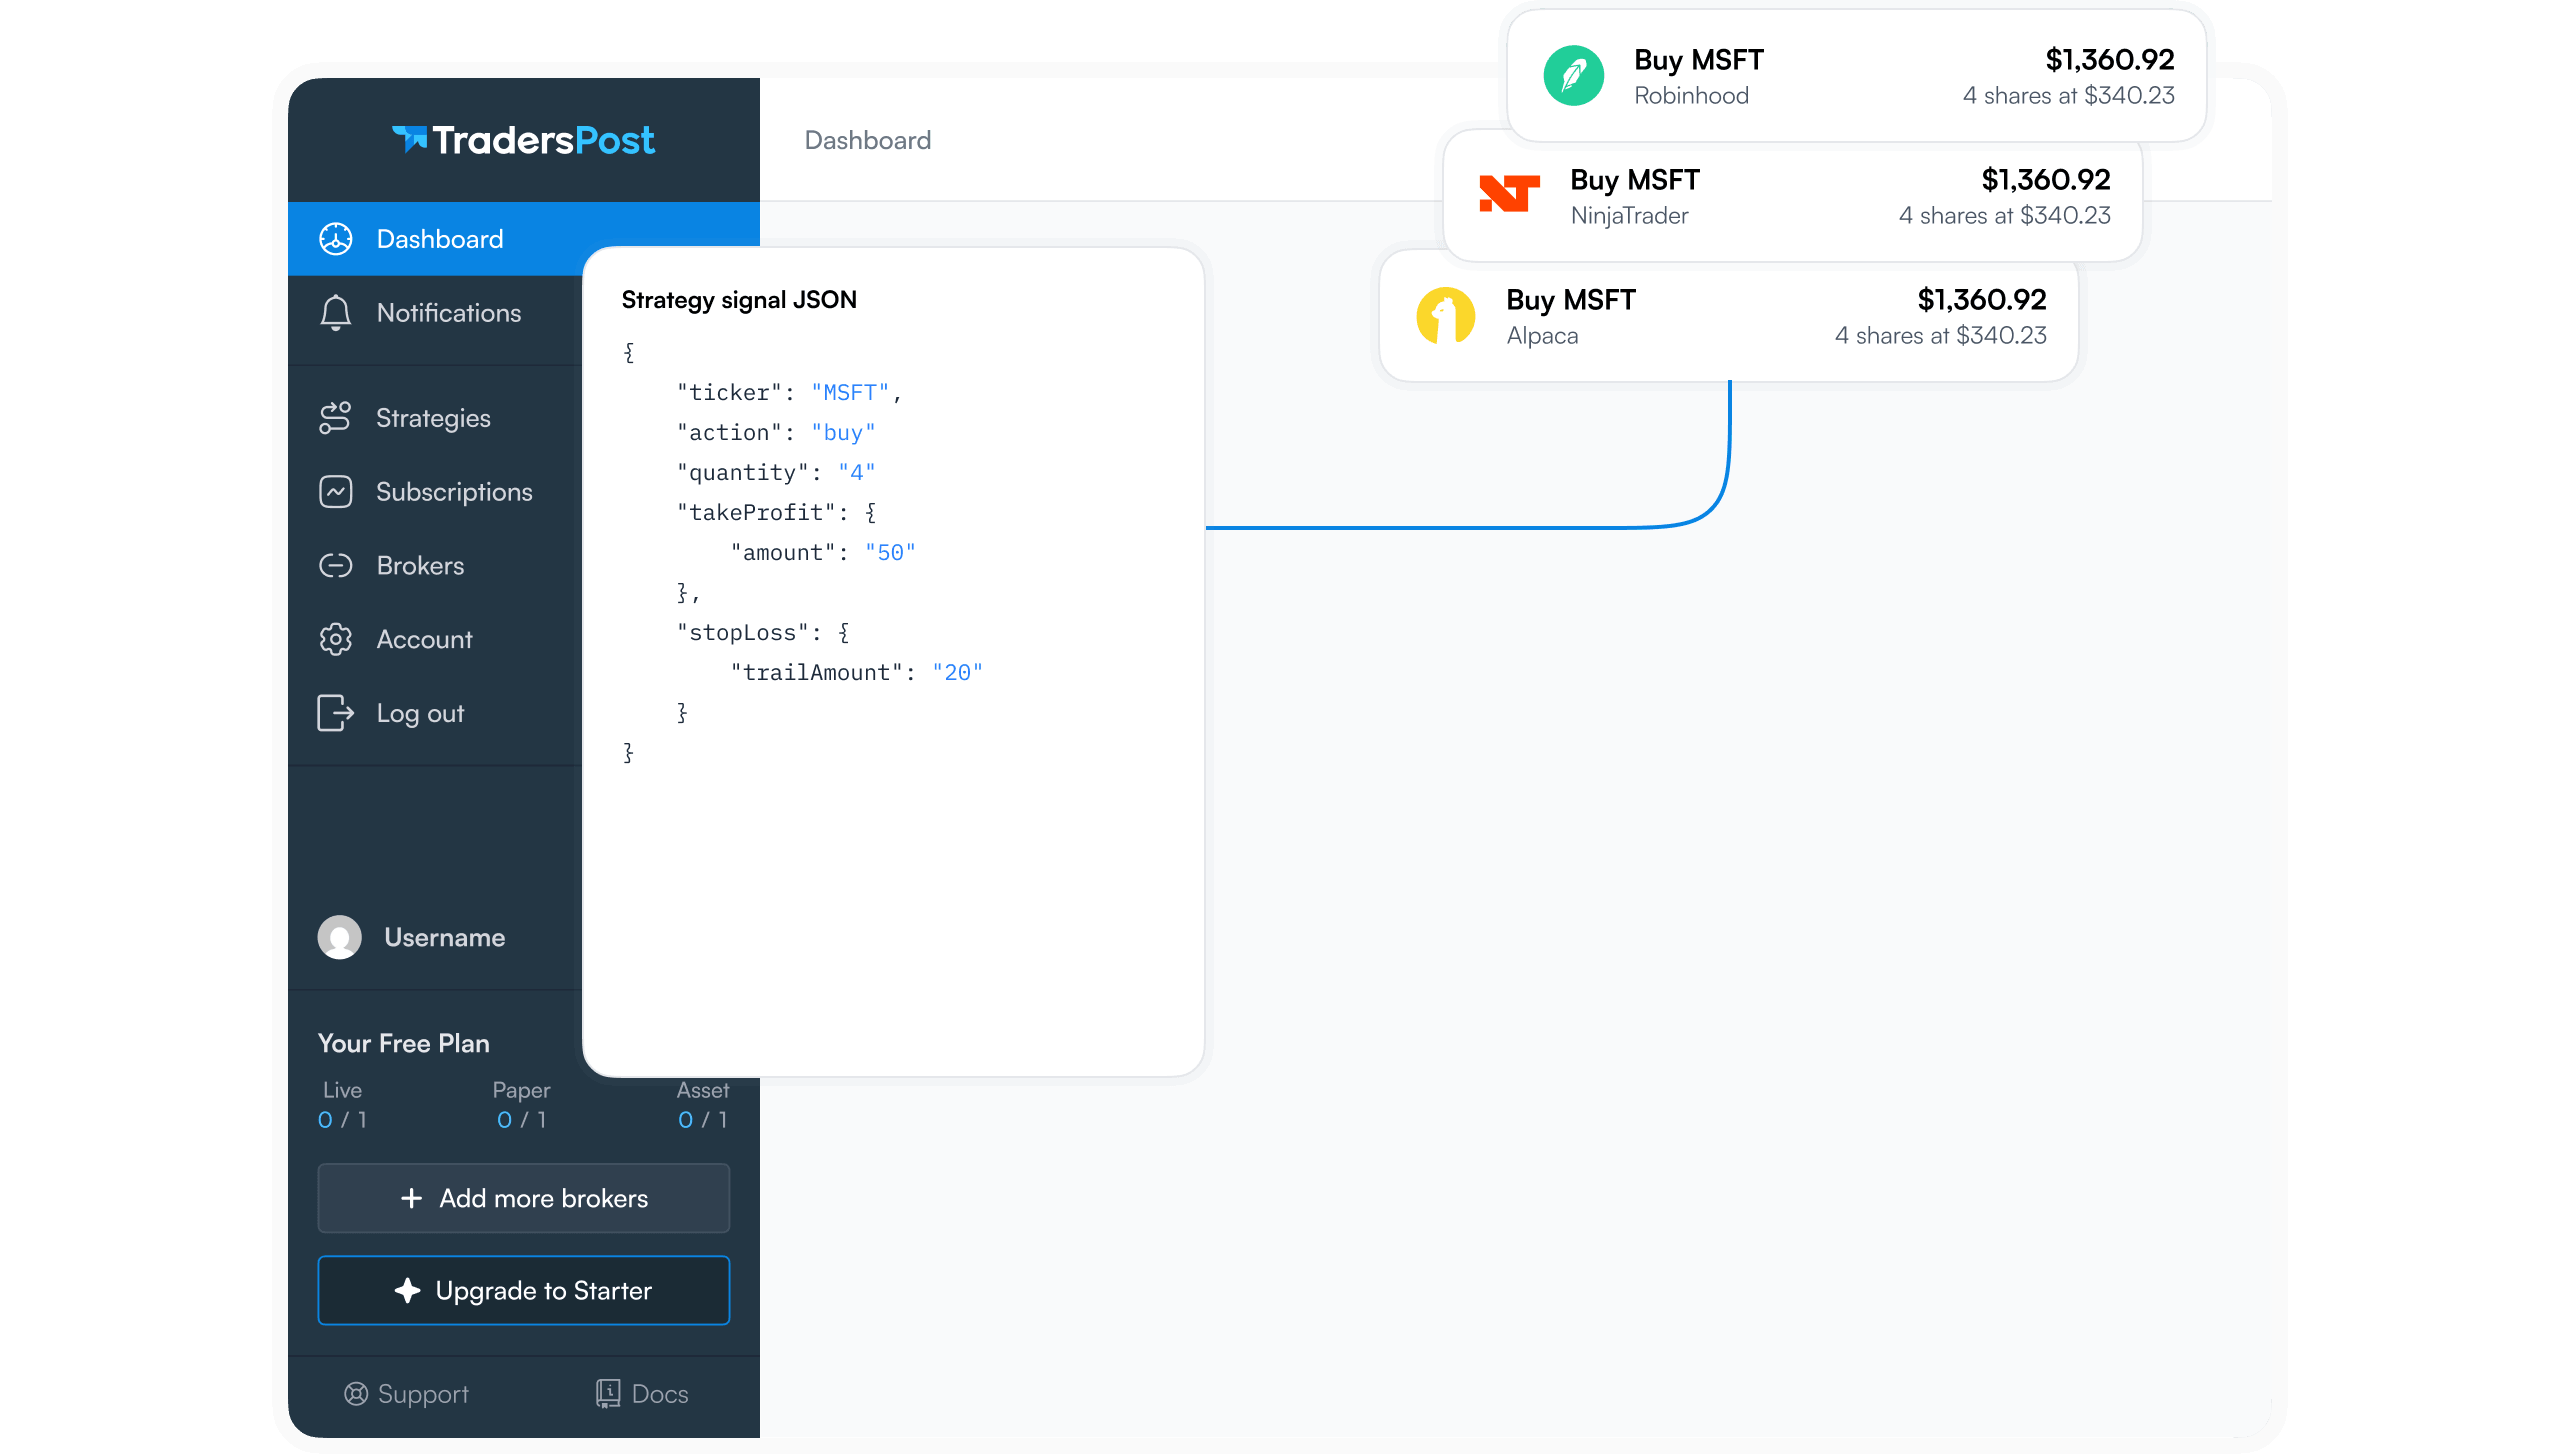
The message body of your TradingView alert should contain the JSON instructions for TradersPost. For strategies that emit strategy alerts, TradingView provides built-in variables that automatically populate with relevant information.
A basic JSON message might include the ticker symbol, action (buy or sell), sentiment (bullish or bearish), and quantity. More advanced messages can include take profit and stop loss prices, order types, and other execution parameters.
TradersPost documentation provides example JSON structures for various scenarios. Start with simple messages and gradually add complexity as you become more comfortable with the system.
Creating Buy and Sell Alerts
Most TradingView strategies require two alerts: one for buy signals and one for sell signals. Clone your first alert and modify it for the opposite direction. Make sure the action in the JSON message changes from "buy" to "sell" to match the alert condition.
Set your alerts to trigger "Once Per Bar Close" to avoid false signals from bars that haven't completed. Use "Open-Ended" for the expiration so the alerts remain active indefinitely. Configure alerts to send messages to the webhook URL but disable app notifications unless you want to be notified of every trade.
Enabling Auto Submit for Full Automation
Once you've tested your setup thoroughly and you're confident in your strategy, you can enable Auto Submit on your subscription. This removes the manual approval step, allowing trades to execute automatically as soon as signals arrive.
Edit your subscription settings and check the "Auto Submit" box. Save the changes. From this point forward, signals arriving at your webhook will be processed immediately and sent to your broker without waiting for manual approval.
This is the true power of automated trading: your strategy can now run 24/7 without your intervention. Trades will execute according to your rules whether you're at your computer, sleeping, or on vacation.
Monitoring Automated Trading Activity
Even with full automation enabled, regular monitoring is essential. Check your TradersPost dashboard daily to review recent signals and executions. Look for any rejected orders, failed signals, or unexpected behavior.
The signal history shows every signal received, when it was processed, and what action was taken. If signals are being rejected, the history will show why, such as insufficient capital, invalid ticker symbols, or broker connectivity issues.
Set up email notifications in your TradersPost account settings to alert you of important events like order fills, rejections, or strategy errors. This keeps you informed without requiring constant dashboard monitoring.
Troubleshooting Common Issues
When signals don't execute as expected, start by checking the webhook signal history. Verify that signals are actually arriving at your webhook. If they're not, the issue is with your alert configuration in TradingView, not with TradersPost.
If signals arrive but aren't creating trades, check your subscription settings. Ensure the subscription is enabled, connected to the correct broker, and not filtered by ticker restrictions that might block the signal.
Order rejections often relate to broker account settings. Verify your broker account has adequate buying power, the symbol is supported by your broker, and you have the appropriate permissions for the order type (such as short selling or options trading).
Scaling to Multiple Strategies
As you gain confidence with one automated strategy, you can expand to multiple strategies and brokers. Create additional webhooks for each strategy to keep signals organized. Create separate strategies for different trading approaches, time frames, or asset classes.
You can also create multiple subscriptions to a single strategy, each connected to a different broker account. This allows one set of signals to control multiple accounts with potentially different position sizing or risk parameters per account.
Best Practices for Automated Trading
Always test new strategies in paper trading before deploying real capital. Even if you've backtested extensively, paper trading reveals real-world issues like signal timing, order execution, and system reliability that backtests can't capture.
Start with small position sizes when going live. You can always increase allocation after you've verified the strategy works as expected in live conditions. It's better to miss some profits while testing than to risk large capital on an unproven automation setup.
Keep your webhook URLs secure. Treat them like API keys or passwords. If a webhook is compromised, delete it and create a new one with a new URL rather than trying to track down who has access.
Document your strategy logic, subscription settings, and any special considerations. When you're reviewing a trade six months later, you'll want to remember why you configured things a certain way.
Conclusion
TradersPost provides a powerful platform for automating your trading strategies. By following this setup guide, you've created webhooks to receive signals, configured strategies to process them, and connected subscriptions to execute trades at your broker. Whether you're automating TradingView strategies, custom Python scripts, or proprietary indicators, TradersPost handles the infrastructure so you can focus on developing better strategies.
Start small, test thoroughly, and scale gradually. Automated trading offers the promise of removing emotion and executing consistently, but only if you build your systems carefully and monitor them appropriately. With the foundation you've built in this guide, you're ready to explore the full potential of trading automation.